Materials
12 (or 24) 12 “ long x1.5” wide strips, one strip for each color of your pencil pack.
13” x 12” of Home Dec fabric (for the back)
13” x 9” strip of Home Dec Fabric , same as the back
 or coordinating, for the pocket
12” of coordinating cord, for closure
1 cord stopper (available at Joanns, etc)
Thread
Fabric Marker
1. Iron the pocket strip to make a 13” by 4.5” strip
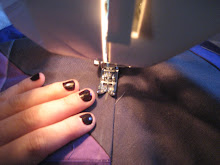
2. Sew the 12 colored fabric strips together, using a ¼ inch seam allowance, in order preferred (I used the order they were packaged in, like a rainbow).

3. Iron seams in the same direction, and iron completed patchwork flat

4. Trim the patchwork rectangle so that top and bottom edges are straight.
5. Pin the pocket (with the unfinished side meeting the bottom of the patchwork rectangle.
6. Mark the seams of each patchwork strip on the pocket with a disappearing ink pen.

7. Sew along the marked lines to form individual slots for each pencil on the pocket. Be sure to reinforce the top and bottom of each slot. Tie off and trim all thread ends.

8. Pin the right side of the backing rectangle to the right side of the patchwork/pocket piece. Double the cord, insert the cord stopper, and place inside the sandwich, just above the pencil slots on one of the sides. Match the ends of the cord with the raw edges of the fabric.

9. Sew a ¼ inch seam allowance along the sides and bottom of the rectangles, making sure to reinforce the cords in the seam by reversing several times along the seam.
10. The seam allowance on the top of the roll will be ½ inch, sew along the side leaving 4 inches unsewn in the middle so you can flip the roll right side out.
*NOTE*: when i prepared the roll for the tutorial I didn't follow my own advice and left a hole open on the side. Don't do what I did!! Follow the written directions in that regard. sorry!!
11. Now turn your roll so the right sides are facing out. You’re almost done!! Make sure the cord is outside the roll (I did it wrong the first time!).
12. Iron down the open seam at the top so that the raw edges are inside the roll, then top stitch along the edge of the entire roll to finish it off.


13. Insert the colored pencils in their assigned slots, fold down the top flap, roll it up, and tighten the cord to keep it all together!! Congrats!!!
Make sure to send it along with a coloring book. Have fun!!


Please be understanding as this is my first tutorial, just let me know if you have any questions or suggestions. Also, let me know if you make one, I want to see pics!!


1 comment:
This is my favorite pencil roll tutorial I have found; you did a great job on your first tutorial! I am making my holiday gifts this month and sharing ideas as a holiday party in July at my new blog, Sewing and Growing, and this is the project I have been working on today. I am going to post mine either later tonight or tomorrow and I will be linking to your tutorial. Thanks for taking the time to make it! I hope you will have time for more blogging soon.
Post a Comment